Key takeaways
- A picklist helps businesses streamline the picking process by listing what products need to be retrieved, where they are stored, and which sales orders they belong to.
- Using an Excel picklist template is a great starting point for small businesses, allowing them to organize orders and reduce unnecessary trips to storage areas.
- Sorting the picklist by location instead of order number can further improve efficiency by minimizing repeated visits to the same storage areas.
- Common picklist issues, such as incorrect item selection or inaccurate counts, can be minimized with inventory software that supports barcode functionality.
- inFlow automates the process by generating picklists directly from sales orders, filling in item locations, and keeping inventory data up to date automatically.
If retrieving products from the shelf is slowing your business down or you are having issues related to incorrectly selecting products, then using a picklist template could be an invaluable tool.
Picking is the process of removing sold products from your inventory — usually to prepare them for shipping. A lot of first-time businesses begin with a simple approach to picking: they’ll open a sales order, go to the back room to gather stock for that order, and then start all over again for the next order. This workflow is fine if you have just a few orders, but it also means a lot of unnecessary trips back and forth.
A faster way of working is to gather your orders and create a list of what needs to be retrieved, where it can be found, and which sales order the product belongs to. A good place to start creating a picklist is to download an Excel picklist template.
This is just one of the many Excel inventory templates we’ve made, so be sure to check them out!
How to add a picklist in Excel
When you click on the template link, it will automatically open in Excel. You will then just have to enable editing and clear the cells to input your picklist information. It’s also important to note that you’ll have to make sure you have up-to-date Microsoft Excel software in order to successfully access and edit the template.
How to use a picklist to speed up the picking process

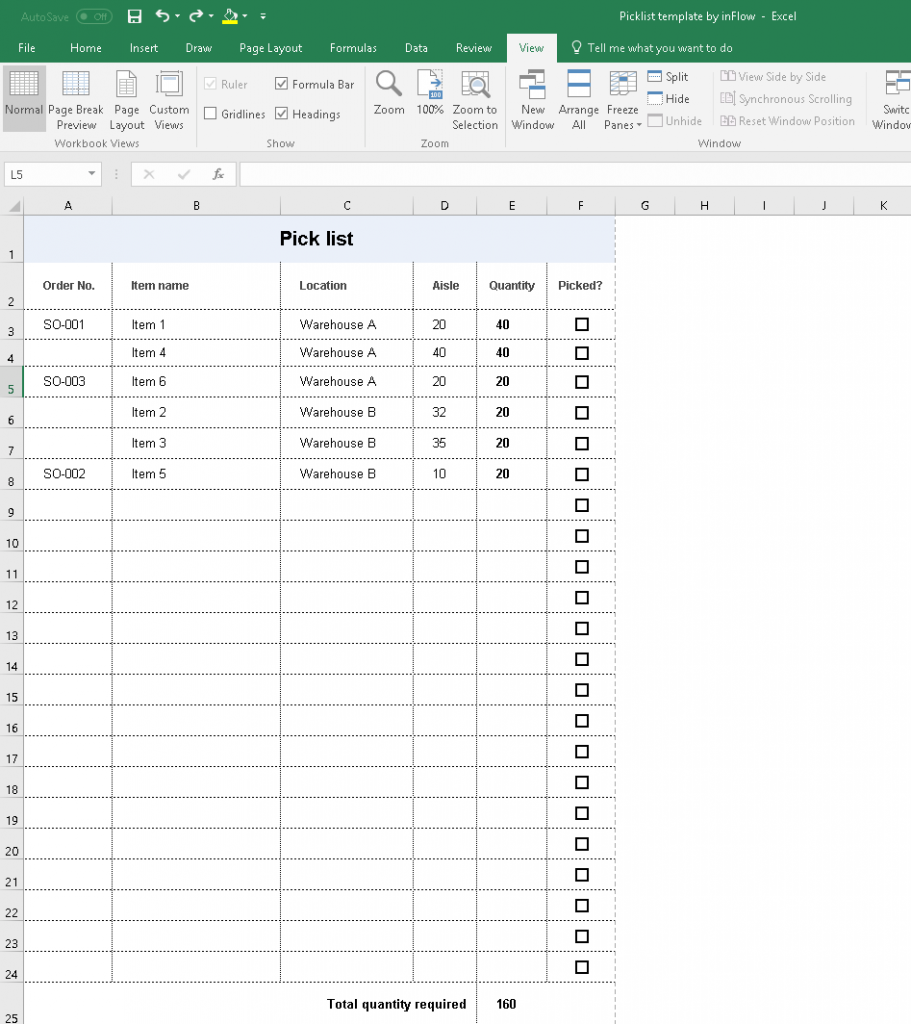
When you load up the template for the first time, you will see six columns. Here is what you should place in each of them:
- Order No. is for sales order numbers, in case you are picking for several orders at once.
- Item name is the name of the product you need to pick.
- Location is the storage location of that product (if you have several).
- Aisle is a sublocation, in case your storage room or warehouse has a lot of subdivisions to look through (you can hide this column if you don’t need it).
- Quantity is the amount of that product you need to pick.
- Picked? is a checkbox to tick off when you print this list out and start picking.
Note: We have left a few example orders and items in the first six rows, so feel free to delete them when you start.
The basic workflow of this picklist is to examine your open sales orders (i.e. the ones that you can fulfill), add all of the products to the picklist, and then print it. If you have too many products to fit on one page, don’t worry: the template comes with three pages. Just scroll down to the next page and add your extra products there.
Then you can head to the back room or storage area to start retrieving products in a single trip, instead of multiple trips back and forth.
Having the printed picklist with you will provide you with all the information you need to find your products and properly assign them to your orders afterward.
A few extra picklist tips
Sometimes you may think you have enough product to fulfill your orders, but once you get to the back room, you find you’re a few pieces short. In cases like this, just write the amount that you were able to pick beside the checkbox in the “Picked?” column.
If you have multiple sales orders that require the same product, it might be more efficient to organize your picklist by Location first, instead of by Order No. This way you can visit each storage location just once, but still process all of your orders. To learn how to filter your Excel picklist by the Location column, have a look at this Microsoft support article.
Common issues when creating and using a picklist
Inventory management often involves an element of guess and check in terms of what strategies and tools will be most effective. However, it is best to anticipate and mitigate issues as much as possible before you start. Some common issues when creating or using a picklist include:
- Mistakes in inventory count and tracking;
- Mistakenly picking the wrong items;
- Poor delegation for item picking;
- Mixups in staging picked items;
- Software errors.
You can solve many of these mistakes with high-quality inventory management software that will reduce both human and computer errors. Such software will help you better organize and manage inventory by prompting you to scan the unique barcodes of items so that any movements or changes of status are immediately and precisely documented.
Generate picklists automatically with inFlow
Our picklist template is easy to use, but you will still need to manually fill it out every time you process your orders.
If you like using picklists and would like to speed things up even more, inFlow can help by handling your complete order flow.
inFlow can keep track of your stock levels and sales orders, and automatically generate picklists for each order (with the locations already filled in). It also helps you know when you need to reorder, so you can avoid losing sales due to stock outages.
Speed up your order fulfillment with inFlow Cloud!


I am purchasing a business that stocks 500-1000 different items. Items are sold by lengths in 1/4 yard increments. Other items are sold in individual pieces. I would like to scan items into inventory and remove them as they are sold.
Which program and pricing would be best for this application?
Hi Harry,
If you’re tracking ~1000 different types of items, inFlow Cloud Essentials plan could help you with that. Monthly and annual pricing is listed here: https://www.inflowinventory.com/cloud?#pricing
If you already have a spreadsheet listing all of the different items, we can help you to import it and get you going faster in Cloud.
You can track items by the piece, by the 1/4 yard, or whatever unit of measure you prefer.
Finally, all of our software is scanner-compatible. You’d just enter the barcodes into inFlow Cloud to associate them with products, and you can then scan them straight onto orders without having to type the names out.
I hope you’ll give inFlow Cloud a try, and if you have any questions, our support team would be happy to help: https://www.inflowinventory.com/software-contact-info