How to create sales orders in inFlow
Managing your sales and inventory can be a daunting task, but with inFlow, it doesn’t have to be. Our powerful software is designed to help your business efficiently track sales orders, manage inventory levels, and fulfill customer orders with ease.
Web

Creating a sales order
- From the Main Menu, click the Create button (plus icon), then select Sales order.
- Select a customer, or select Start with new customer to add a new customer to inFlow.
Order details
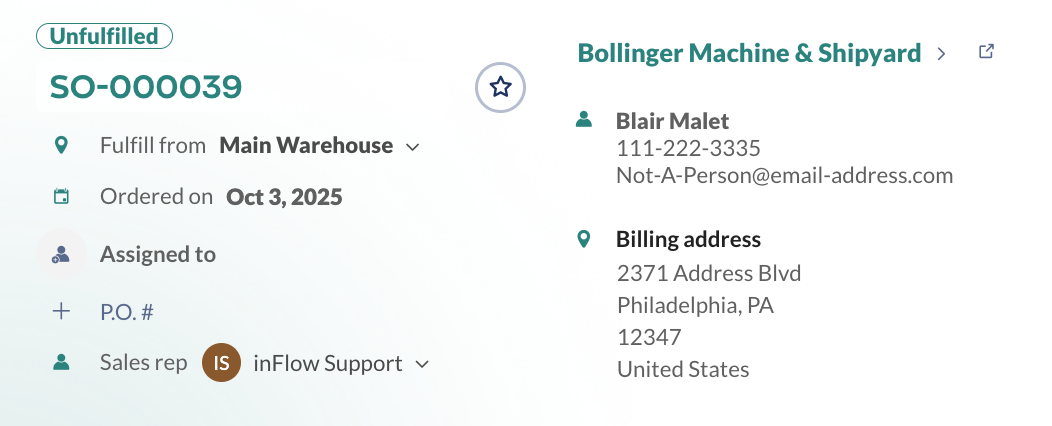
At the top of the sales order, you will find all the important details regarding the order. Check out the info below to learn more!

Towards the left of the order details, you’ll find the:
- Billing address
- Fulfillment status
- Order number
- Order date
- Assigned to
- P.O #
- Sales rep
- Order priority (star icon)
- Customers name
- Customer contact
Select the customer’s name to review their address or change the customer. To review more details about a customer, click the link next to their name to open their profile in a new tab.
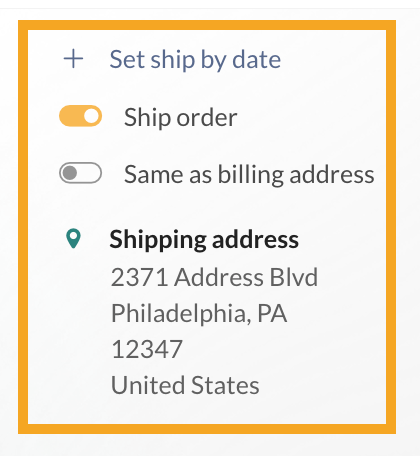
In the middle of the order details, you can select Set ship by date to record when this order should be shipped. Click the Ship order toggle to view your customer’s shipping address, or you can select the Same as billing address toggle.
If your team needs to track information that inFlow doesn’t have fields for, select Add custom fields to add them to inFlow. You can learn more about creating custom fields from this guide.
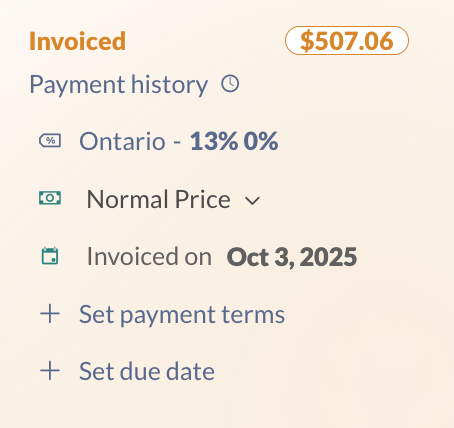
The right side of the order displays all payment information, including
- Payment status
- Payment history
- Taxing scheme
- Pricing scheme
- Invoice date
- Payment terms
- Due date
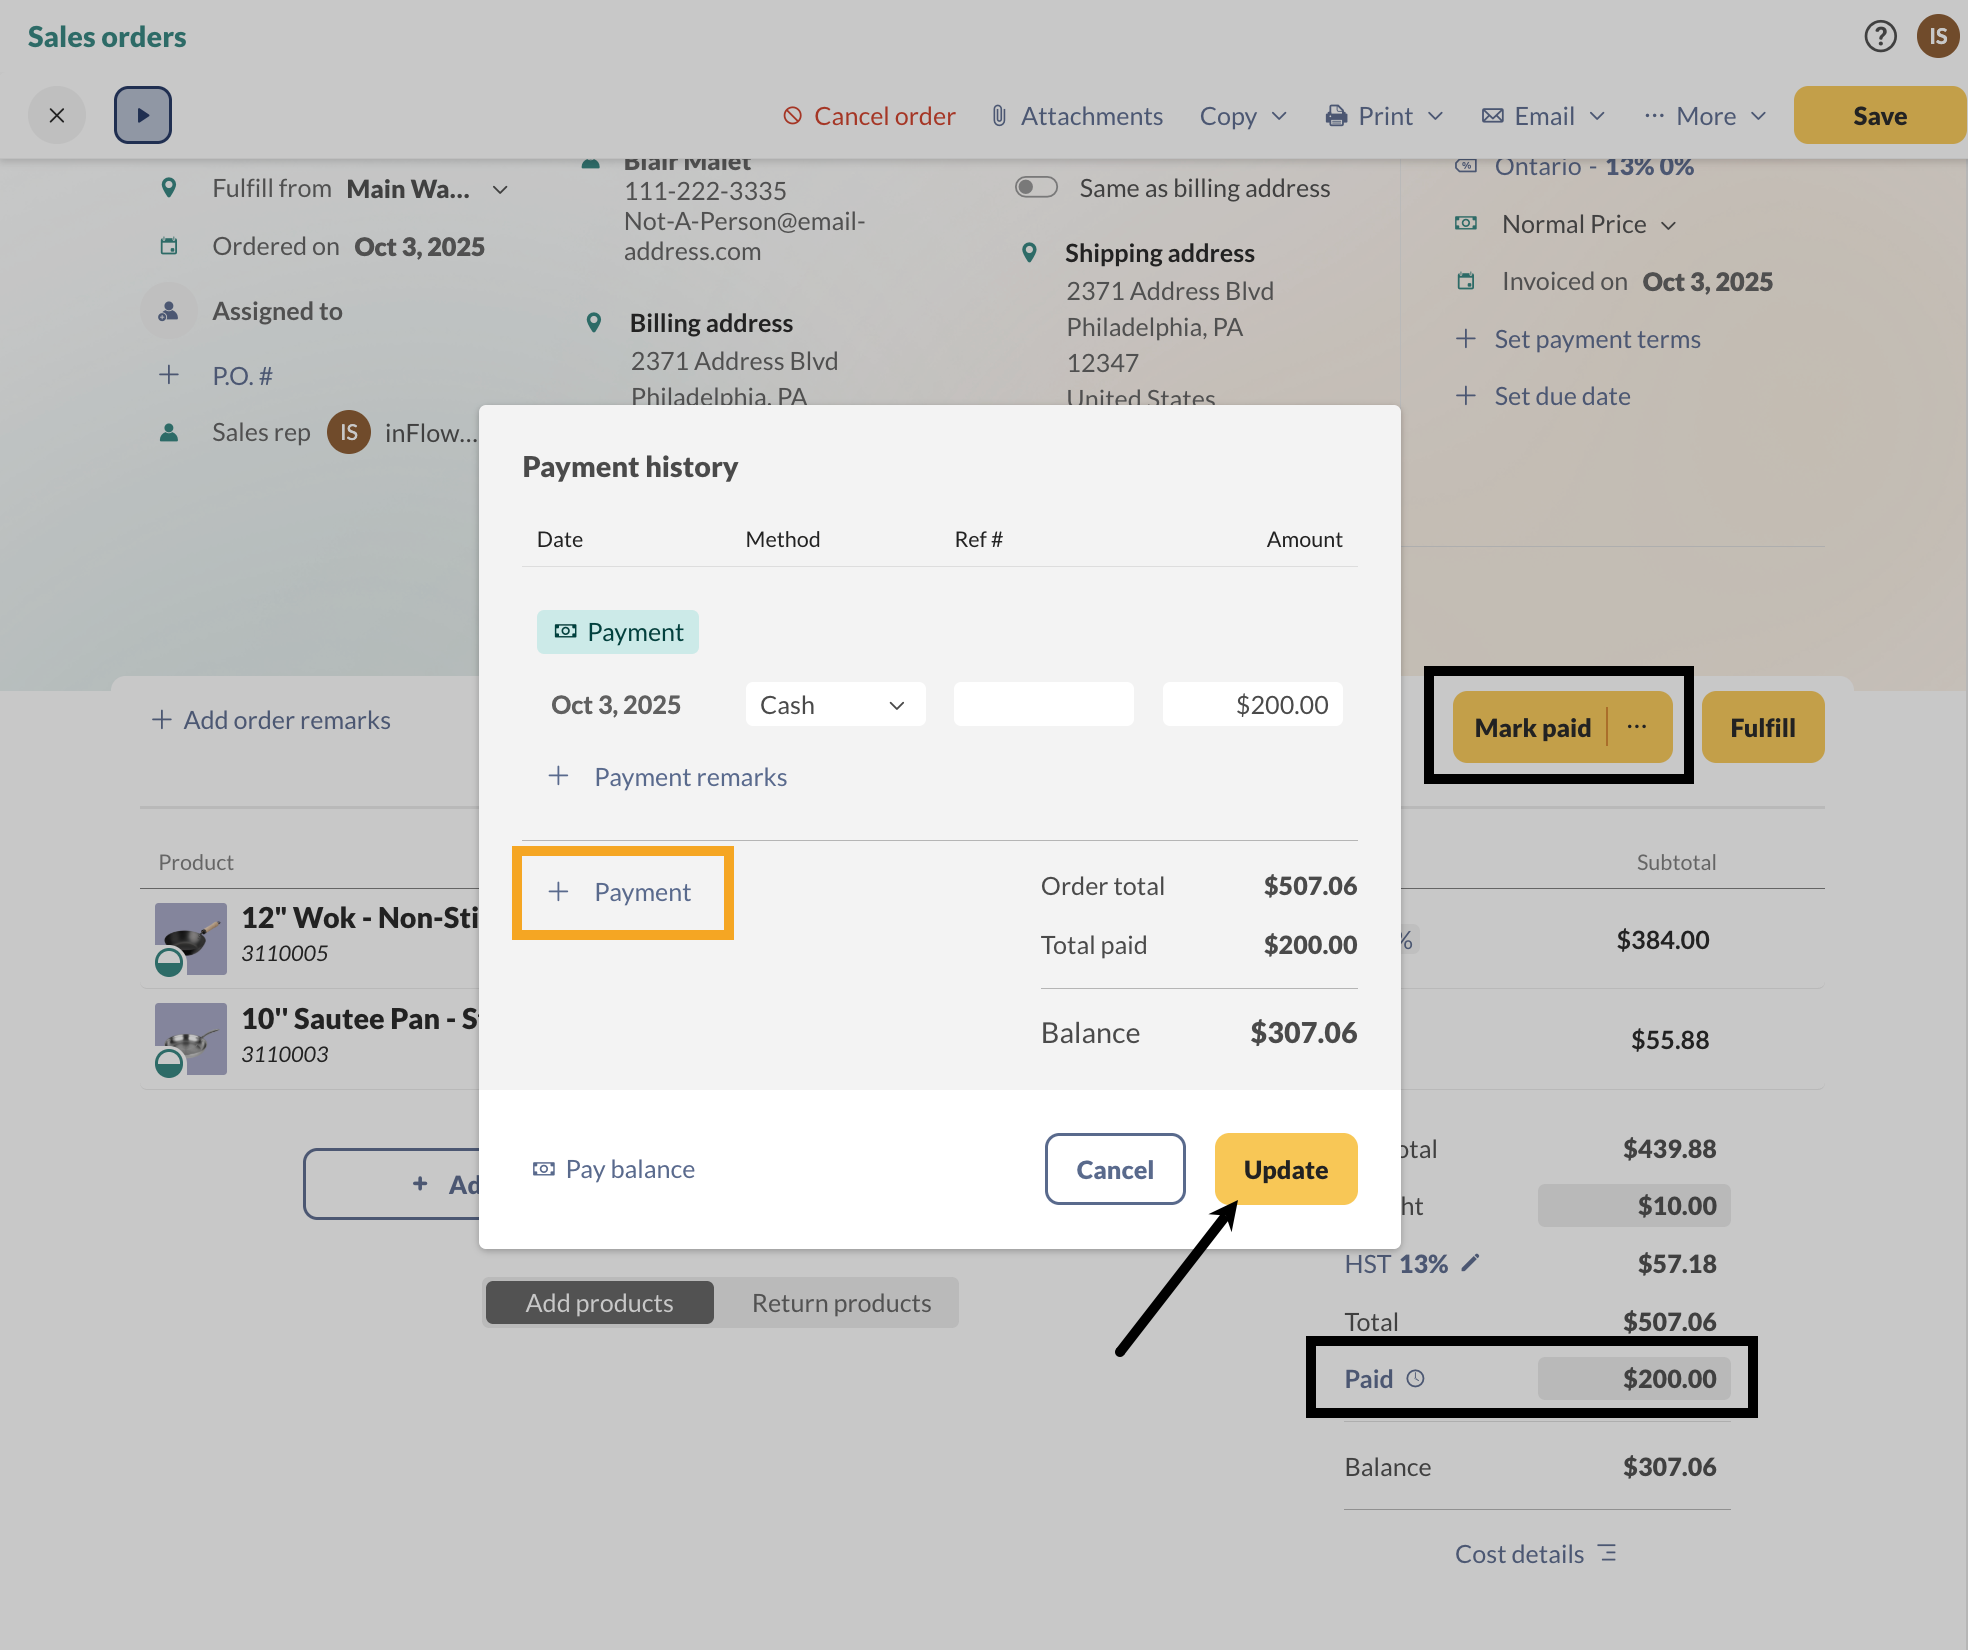
To view or make full or partial payments for an order, select Payment history.
Product table
The product table has two primary tabs:
- Order: This is where you add products to the sales order.
- Pick: This tab enables you to track which products have been picked for the sales order.
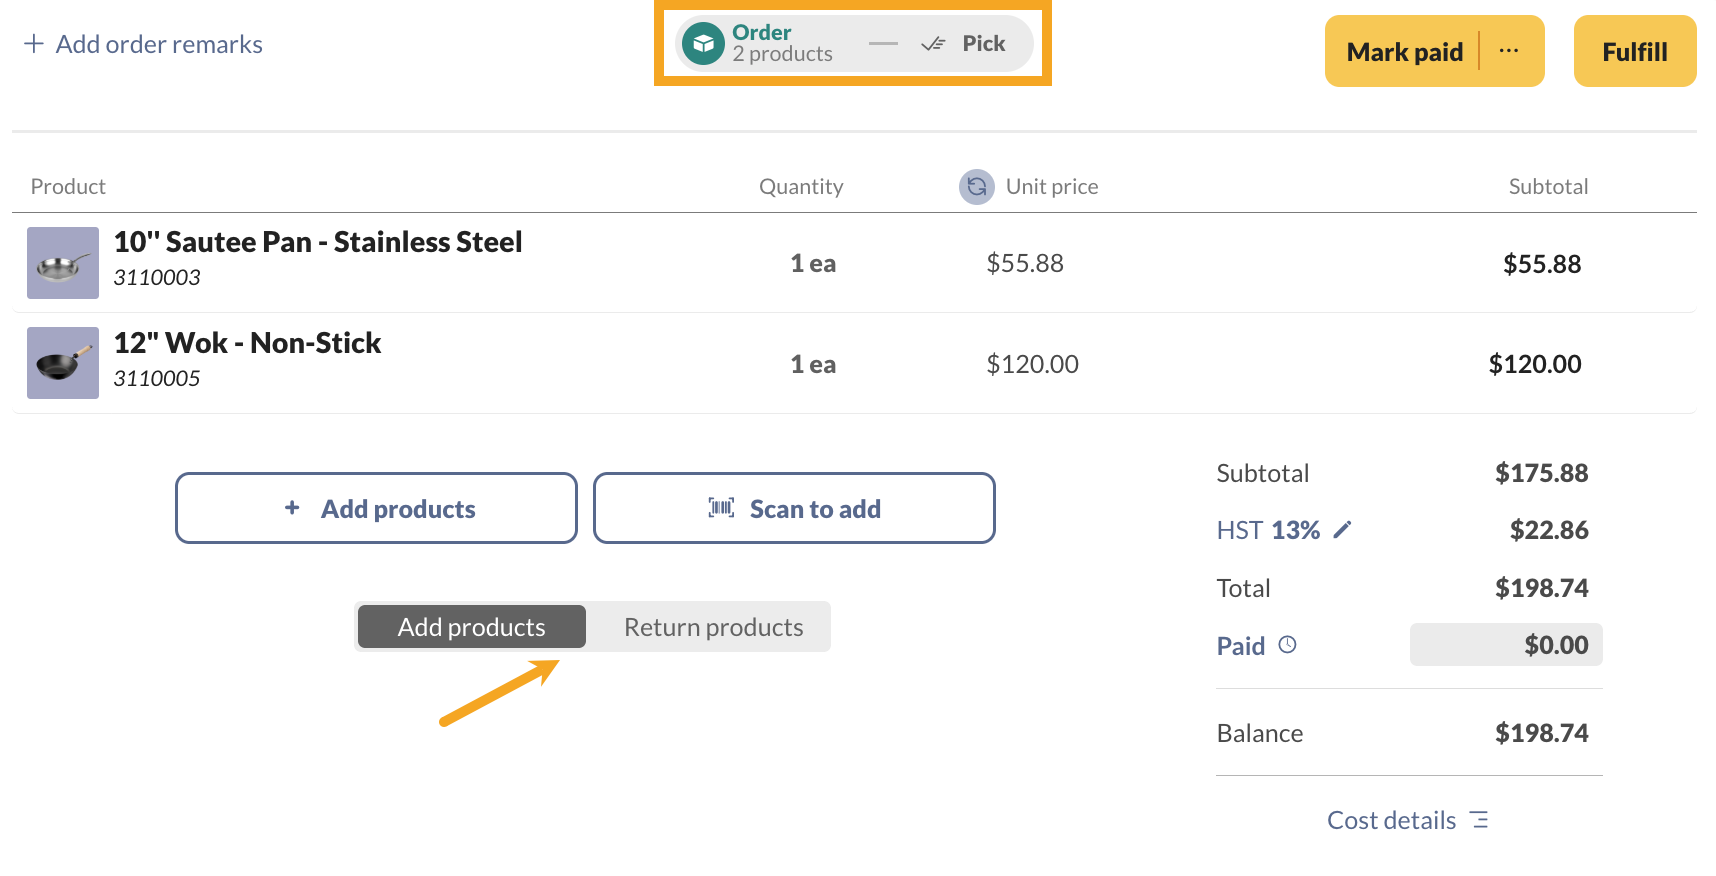
Product table completion statuses
Right below the tab headings are the product table statuses. The Order tab shows the number of product line items on the product table.
Below the Pick tab, the percentage displays how much of the order has been picked.
The Restock tab displays the percentage of products returned to your inventory after a customer return is processed.
The Restock tab is only available when processing returns.

Adding products to sales orders
- In the product table, click on Add products or Scan to add to select products.
- The product picker will stay open, allowing you to select multiple products. To increase the quantity of a single product, click/scan the same product repeatedly.
- Edit the Quantity and Unit price. Optionally, add a discount to individual line items.
- You can change the sorting order in the product table by selecting the grab handles to rearrange products or by choosing the table headings.
- Next to the Save button, you can print, email, or add an attachment to the order.
- Click Save when done.
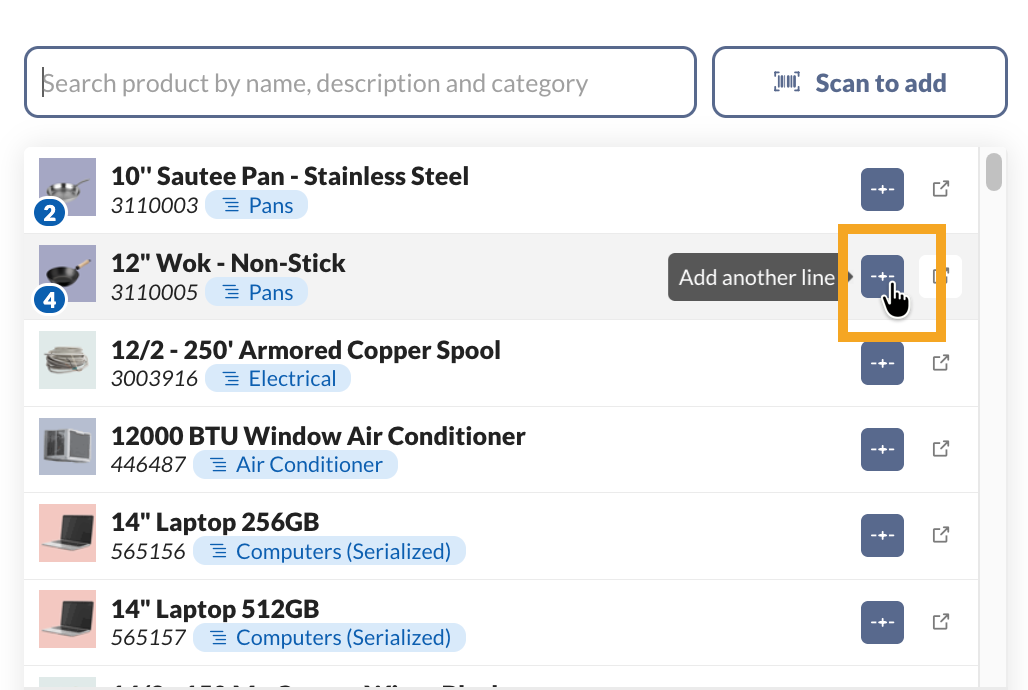
To add the same product to another line on the sales order, select the blue Add another line button next to the product.
Did you know you can buy barcodes with inFlow? We’ve partnered with GS1 as an official partner, which allows you to create UPC barcodes that will be recognized by retailers such as Amazon and Walmart. For more details, check out the GS1 Barcode Shop.
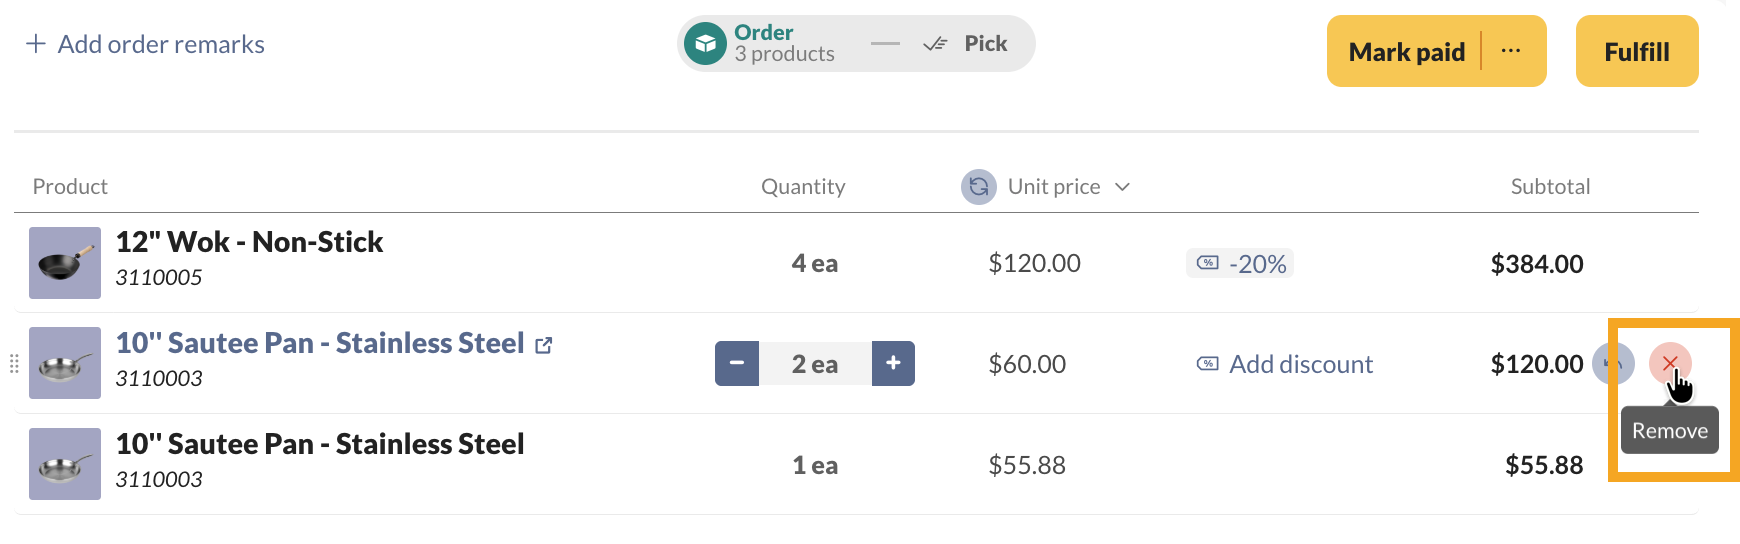
Removing products from an order
- Hover over the row containing the product you want to remove.
- Click the X button beside the row to remove it.
Invoicing a sales order
When invoices are emailed or printed, inFlow updates the payment status to Invoiced. If there is no need to print or email the invoice, you can manually mark it as invoiced by clicking the ellipsis button next to ‘Mark Paid’ and selecting’ Mark Invoiced’.
Only sales orders marked as invoiced, paid, or partially paid are sent to QuickBooks Online or Xero.
Completing sales orders
A sales order is complete once all products have been picked and the order has been paid in full.
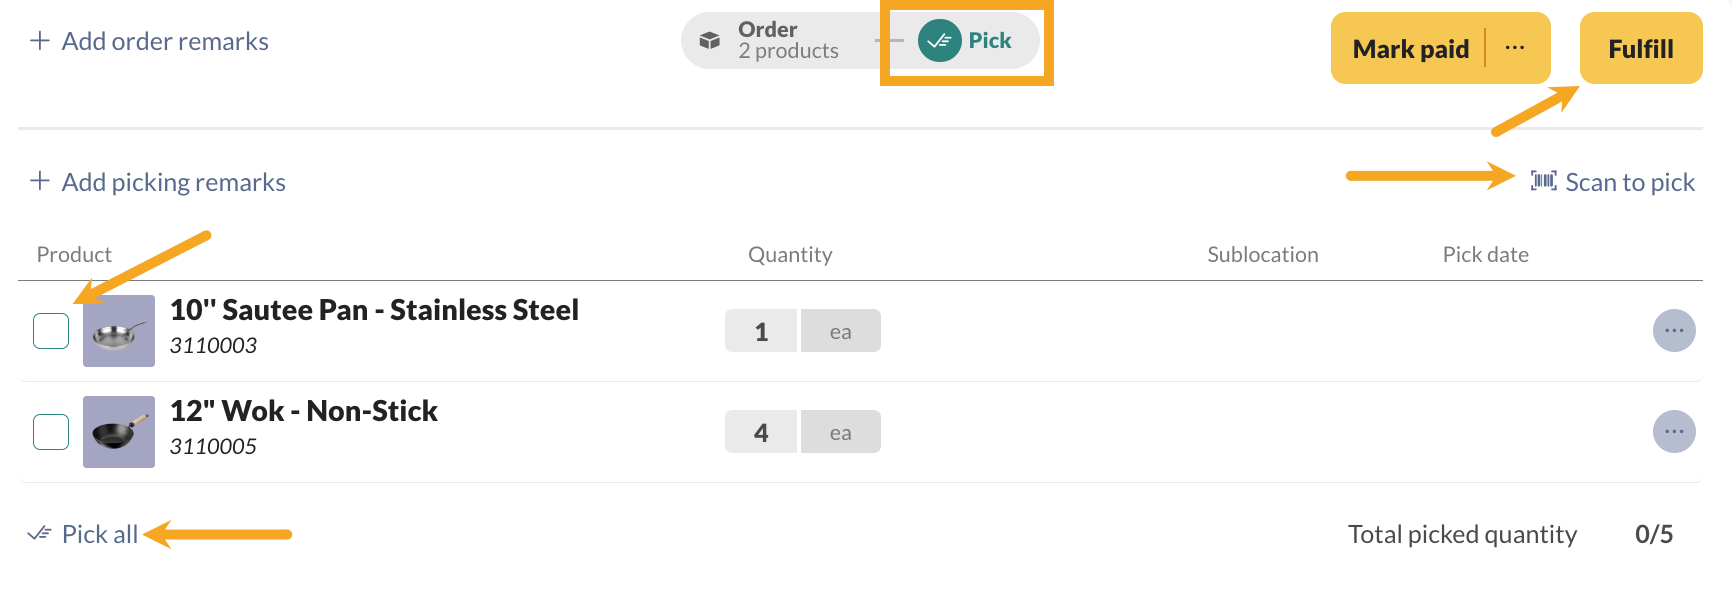
Picking products
- Select the Pick tab.
- Select the checkbox next to each product to pick them, or select Scan to pick if you’re using a barcode scanner.
- Save the order when done.
You can fulfill the entire order by selecting Fulfill or Pick all.
Partially picking sales orders
- Select the Pick tab.
- Click on the Quantity field, enter the amount that was picked, then click Partial Pick.
- Optionally select the Pick date column to enter the date the product was partially picked.
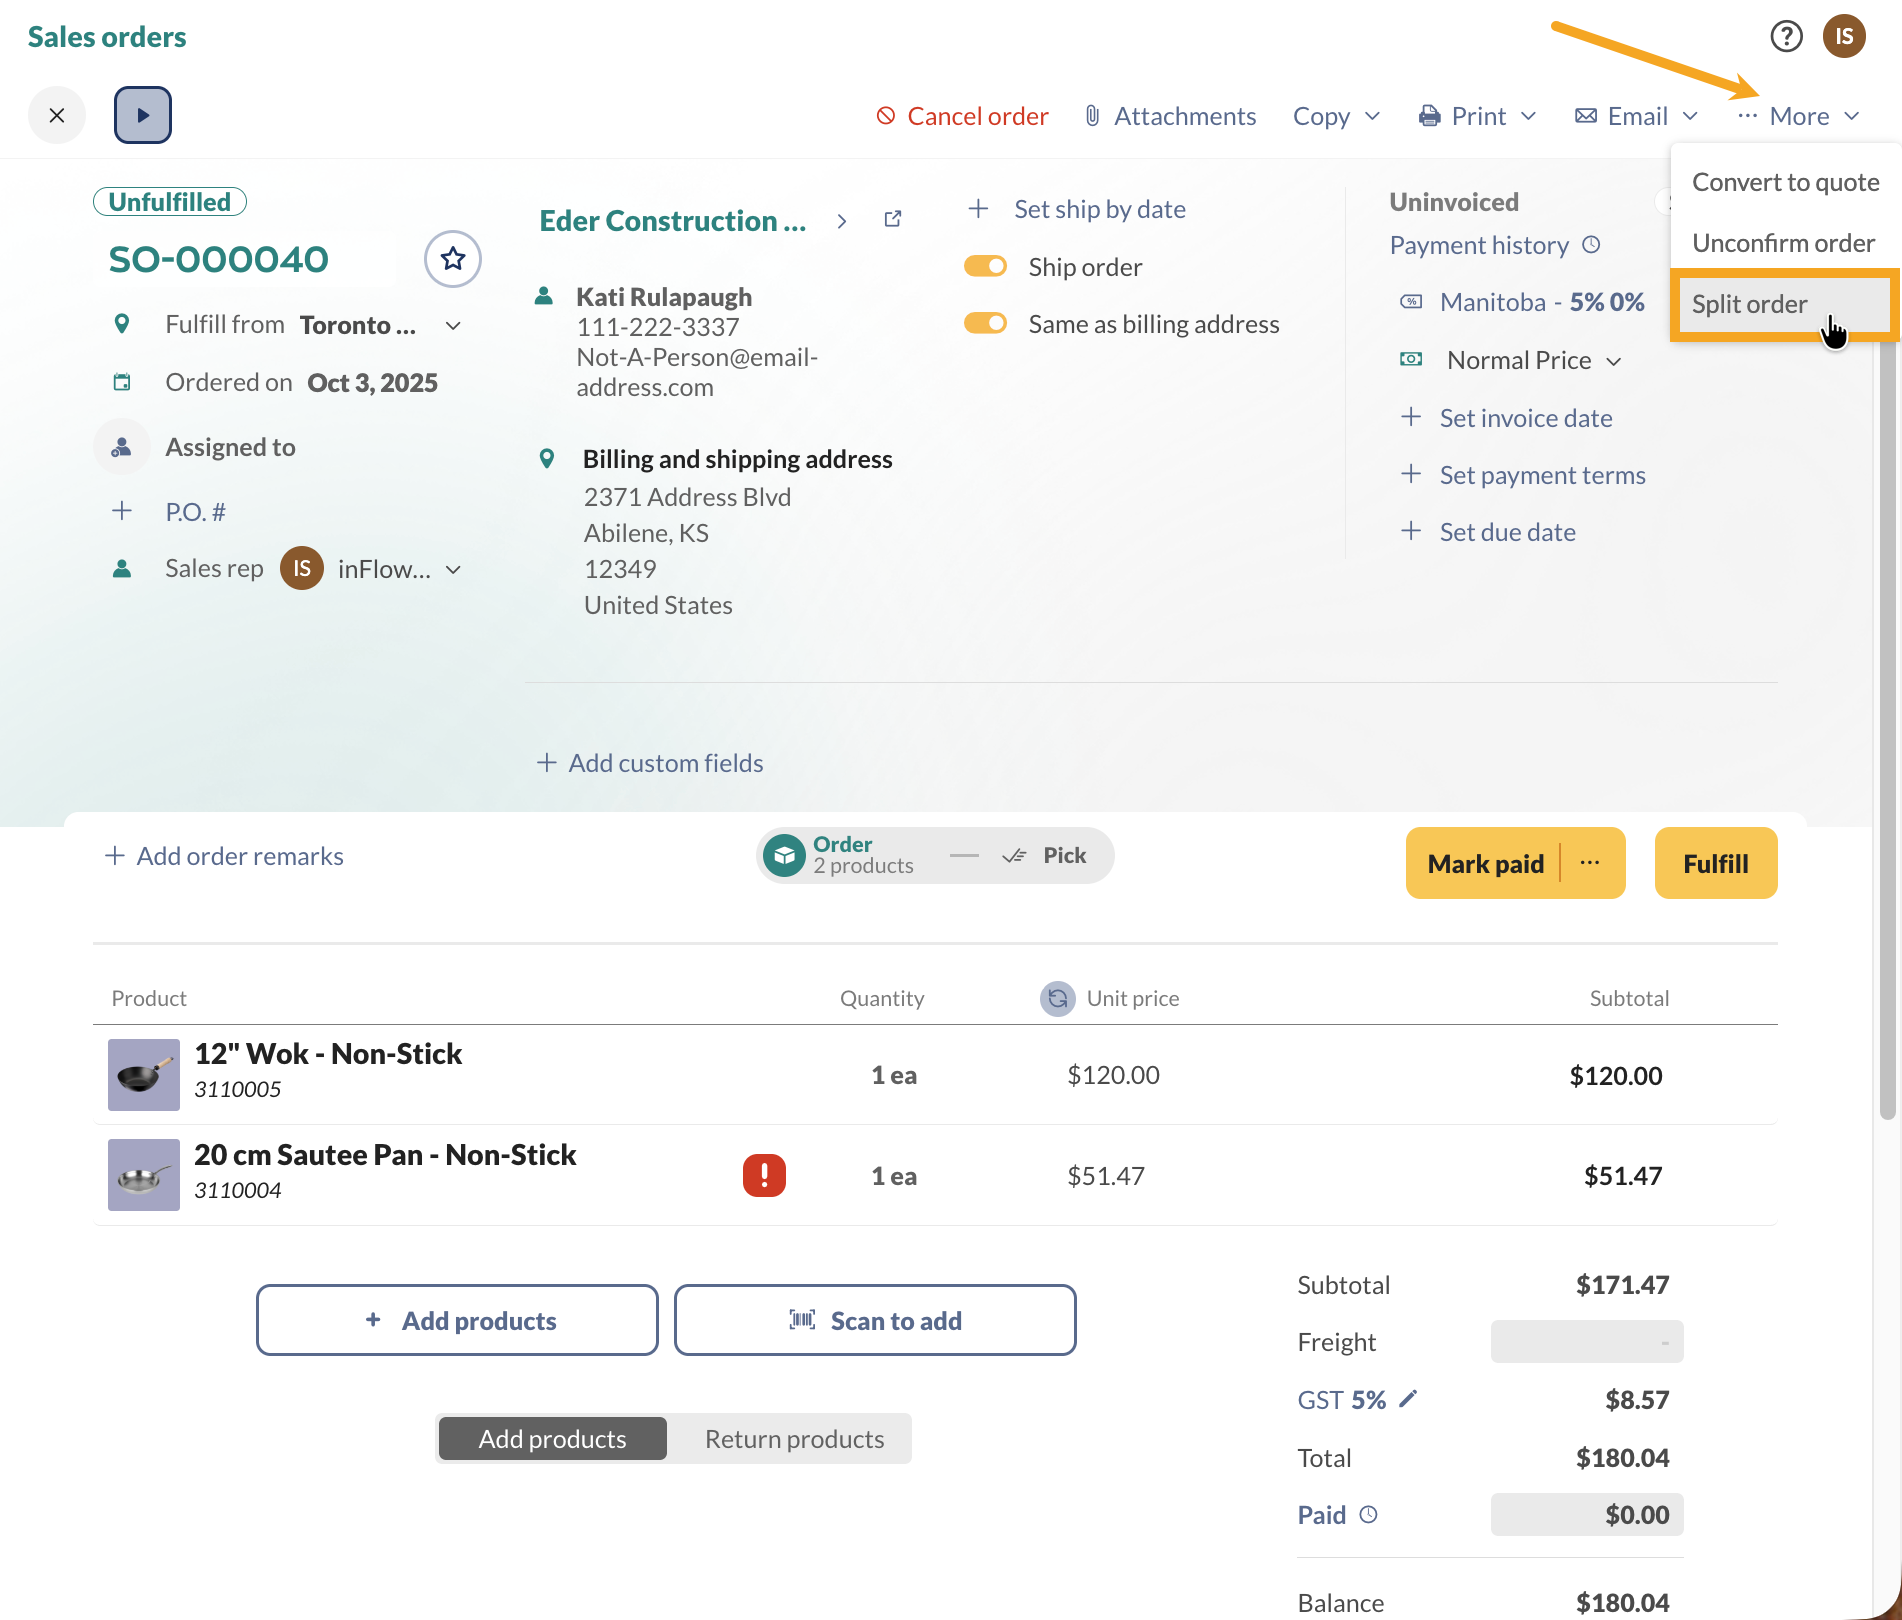
Backorder/splitting orders by quantity on hand
If products on the sales order are backordered, you can split the sales order so that you can fulfill the products that are on hand, and then fulfill the remaining products when they become available.
- Open a sales order and click the More button in the Action menu.
- Click Split order.
- You’ll see a Split order by inventory on hand message asking you to confirm the changes. Select Split order.
- A confirmation message will display the newly created sales order. To view it, click Open in a new tab or select Close.
Shipping sales orders

- Click the Ship order toggle at the top of the sales order to ship it to your customer. The Ship tab will appear once products are fully or partially picked in the sales order.

- Click on Ship order to pack all products into a single box, or select Ship with multiple boxes.
- Fill out the Shipping details, then select Ship order.

- If shipping products in multiple boxes, select the product(s), then choose Ship this box and fill out the Shipping details.
- Select Add box to include additional boxes in the sales order, then choose the product to be packed in that box. Repeat this step to pack the remaining products.

Paying sales orders
- For sales orders that will be shipped, enter the shipping fee in the Freight field.
- To pay for your order in full, click Mark paid or enter the amount in the Paid field.
- To add details, such as a reference number or payment method, click the Paid button or select Payment history from the top-right corner.
- Save the order when done.
Tracking multiple payments
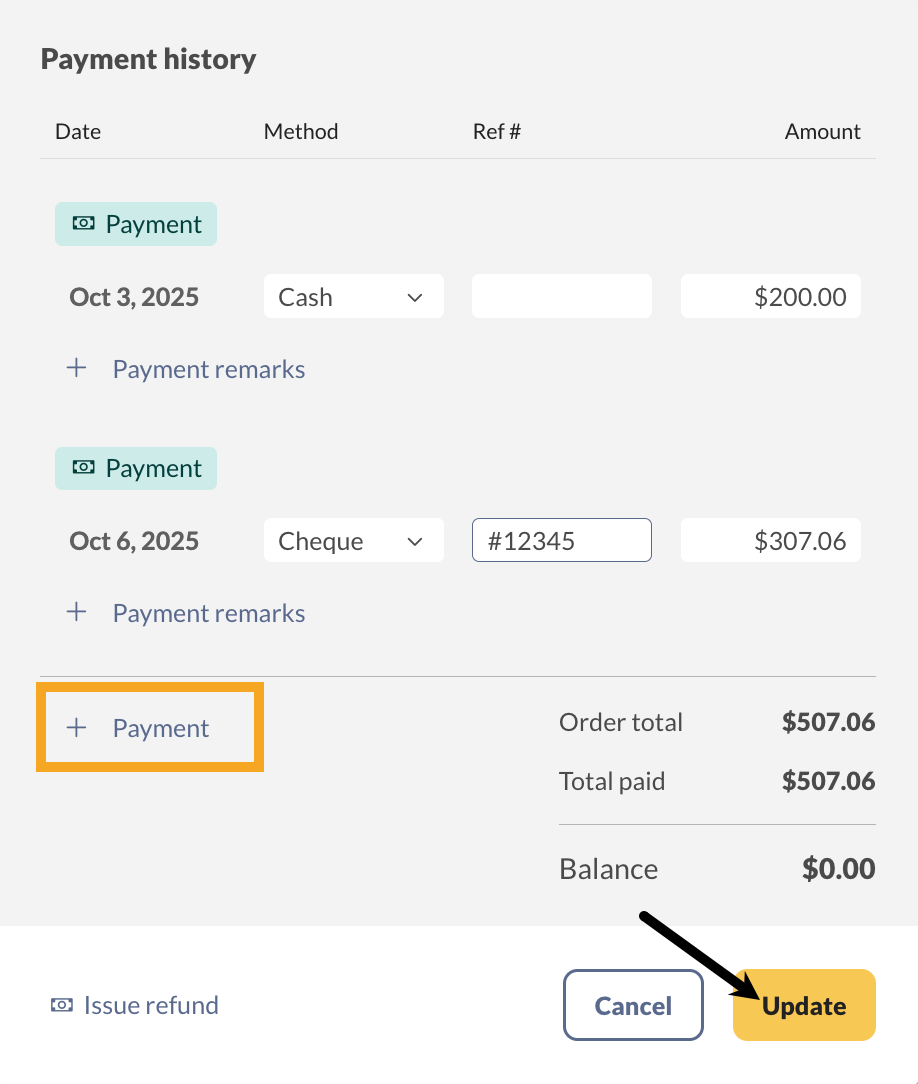
If your sales order is paid with multiple payments, you can use the Payment history screen to enter the details.
- On the order, click Paid to open the Payment history screen.
- Select Payment, then enter the amount.
- Click Update, then save the sales order
Tracking sales expenses, fees, etc.
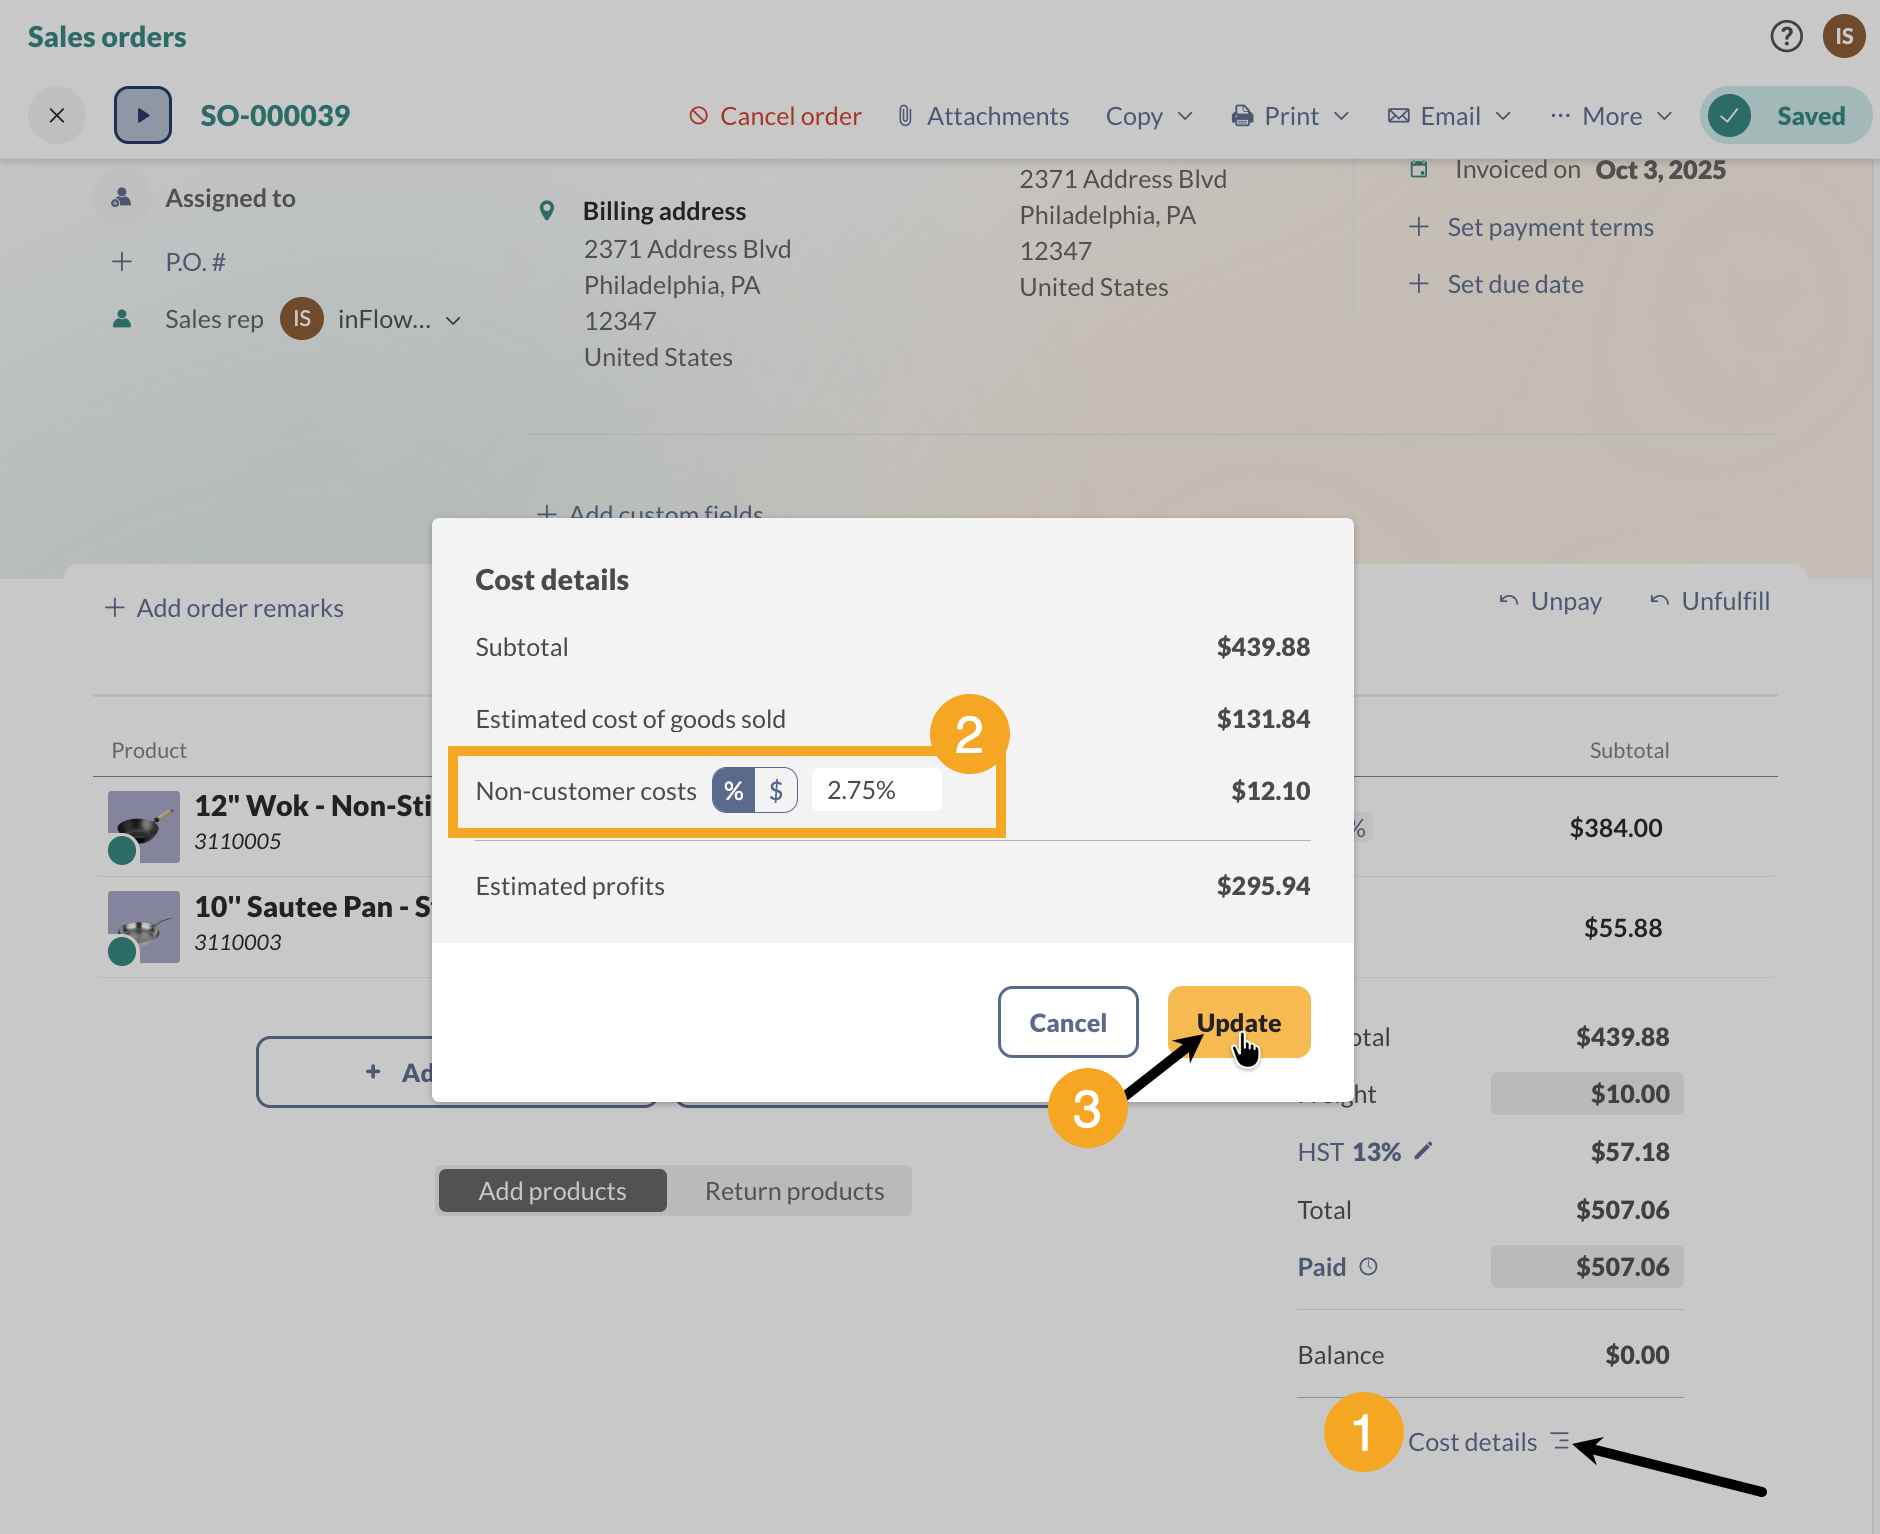
To track payments that don’t go to your customer, such as sales fees, use the Non-customers costs field to track those expenses.
- Click on Cost details at the bottom right of the sales order.
- Select either the percentage or the dollar amount, then enter the expense amount in the field.
- Click Update when done, then save the sales order.
Serialized products
- From the Order tab, add the serialized product to the order, and enter the quantity.
- Click on the Pick tab, select the product to open the serial number selection.
- Select the serials or click on Auto pick serials, then click Save.
- Save the sales order when done.
After all serial numbers have been added to the order, the icon next to the Quantity field will turn solid blue.
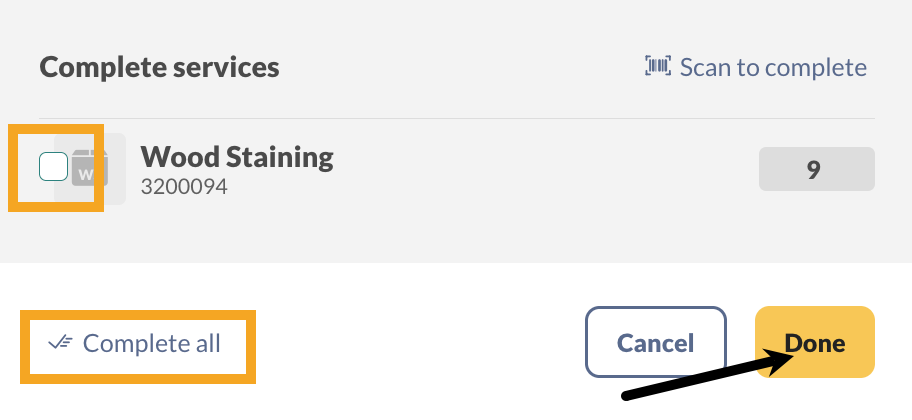
Service products
- From the sales tab, add the service product to the order.
- Click the Pick tab, and select Complete services.
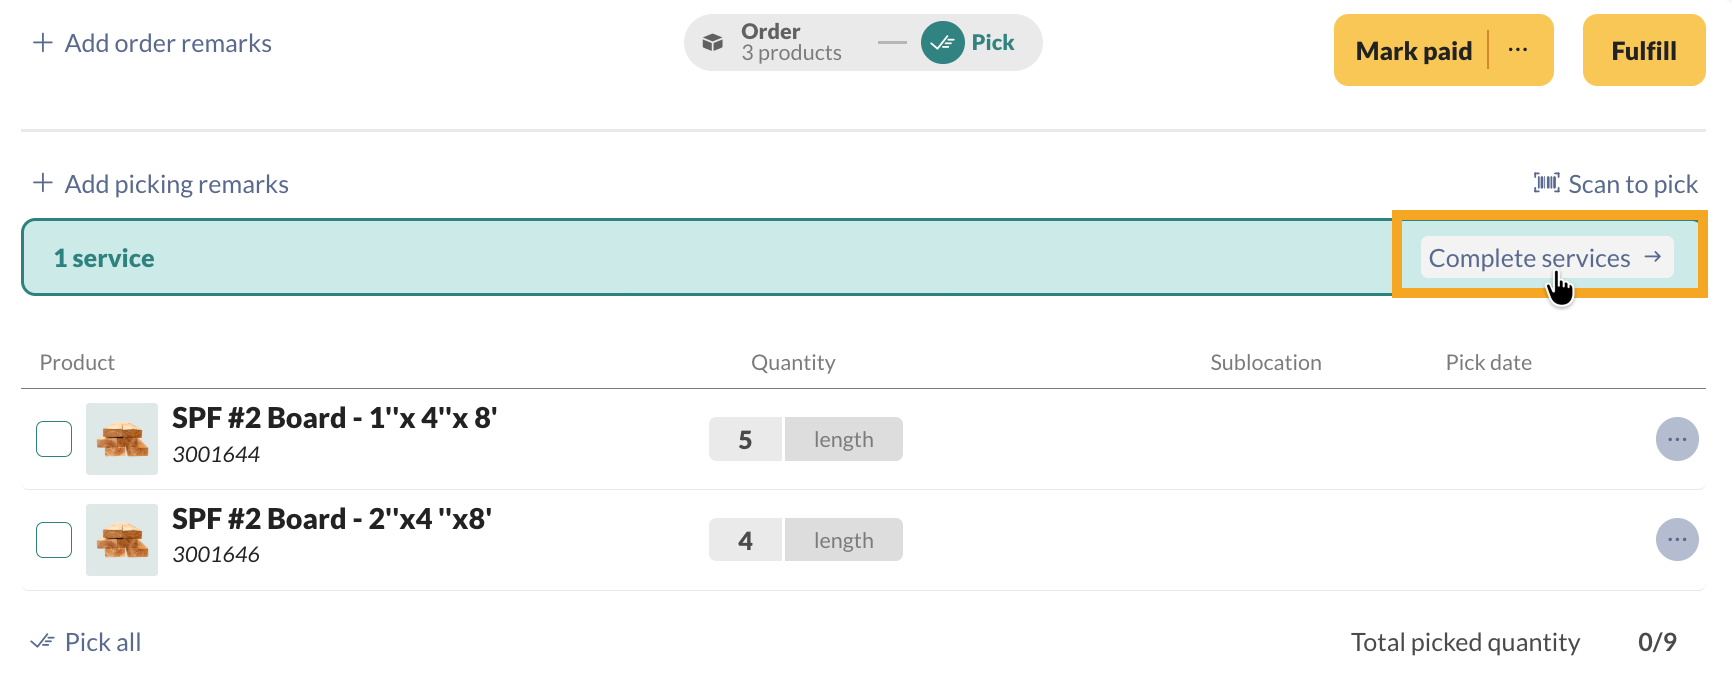
- Select the services that have been completed, or select Complete all.
- Click Done to return to the order.
Returning products on sales orders
Option 1 – Returning products on an existing order
- From the product table, hover over the product and select the blue arrow to return to the product.
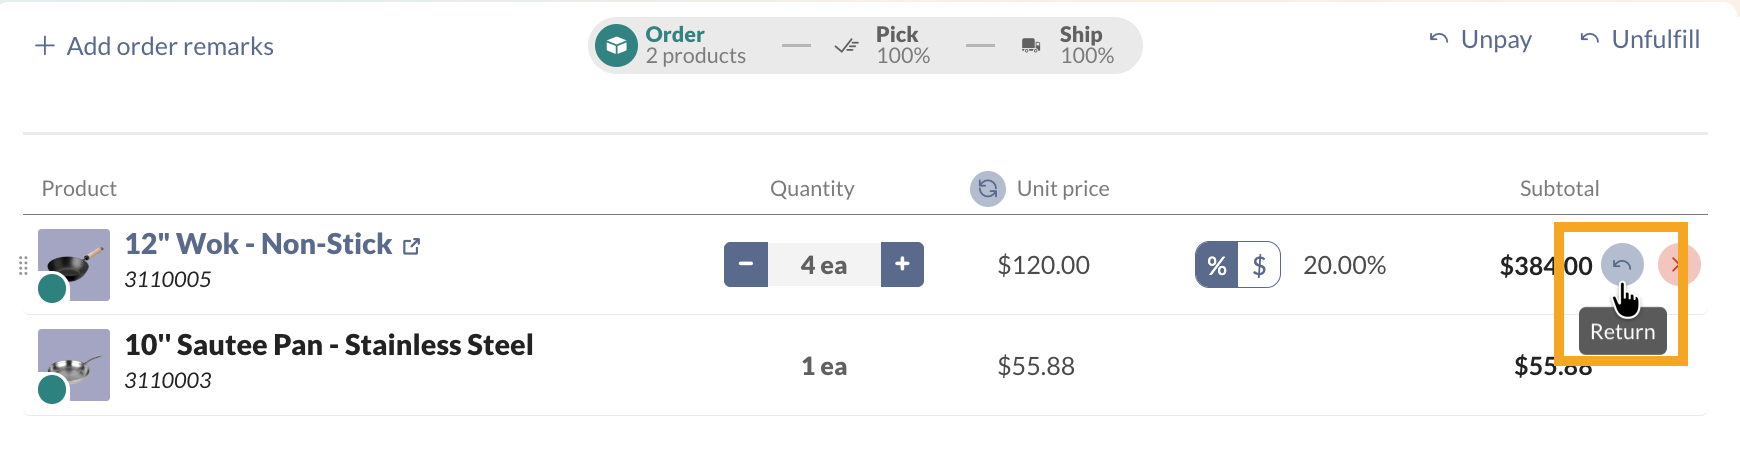
- The returned product will be added below with the same unit price and quantity that is on the order. Edit the quantity you’re returning.
- Click the Restock tab, then click the Restock button to add the returned products to your inventory. On this tab, you can also select the Discard button if the product(s) are no longer usable.
- If payment is outstanding, select Refund or the ellipsis next to Refund to offer credits to your customer.
- Save the order when done.

Option 2 – Returning products on a blank sales order
- Click on Return products and select the products you’re returning from the product picker.
- Below the product table, select Return products.

- Edit the quantity your customer is returning.
- Click the Restock tab, then click the Restock button to add the returned products to your inventory. On this tab, you can also select the Discard button if the product(s) are no longer usable.
- If payment is outstanding, select Refund or the ellipsis next to Refund to offer credits to your customer.
- Save the order when done.

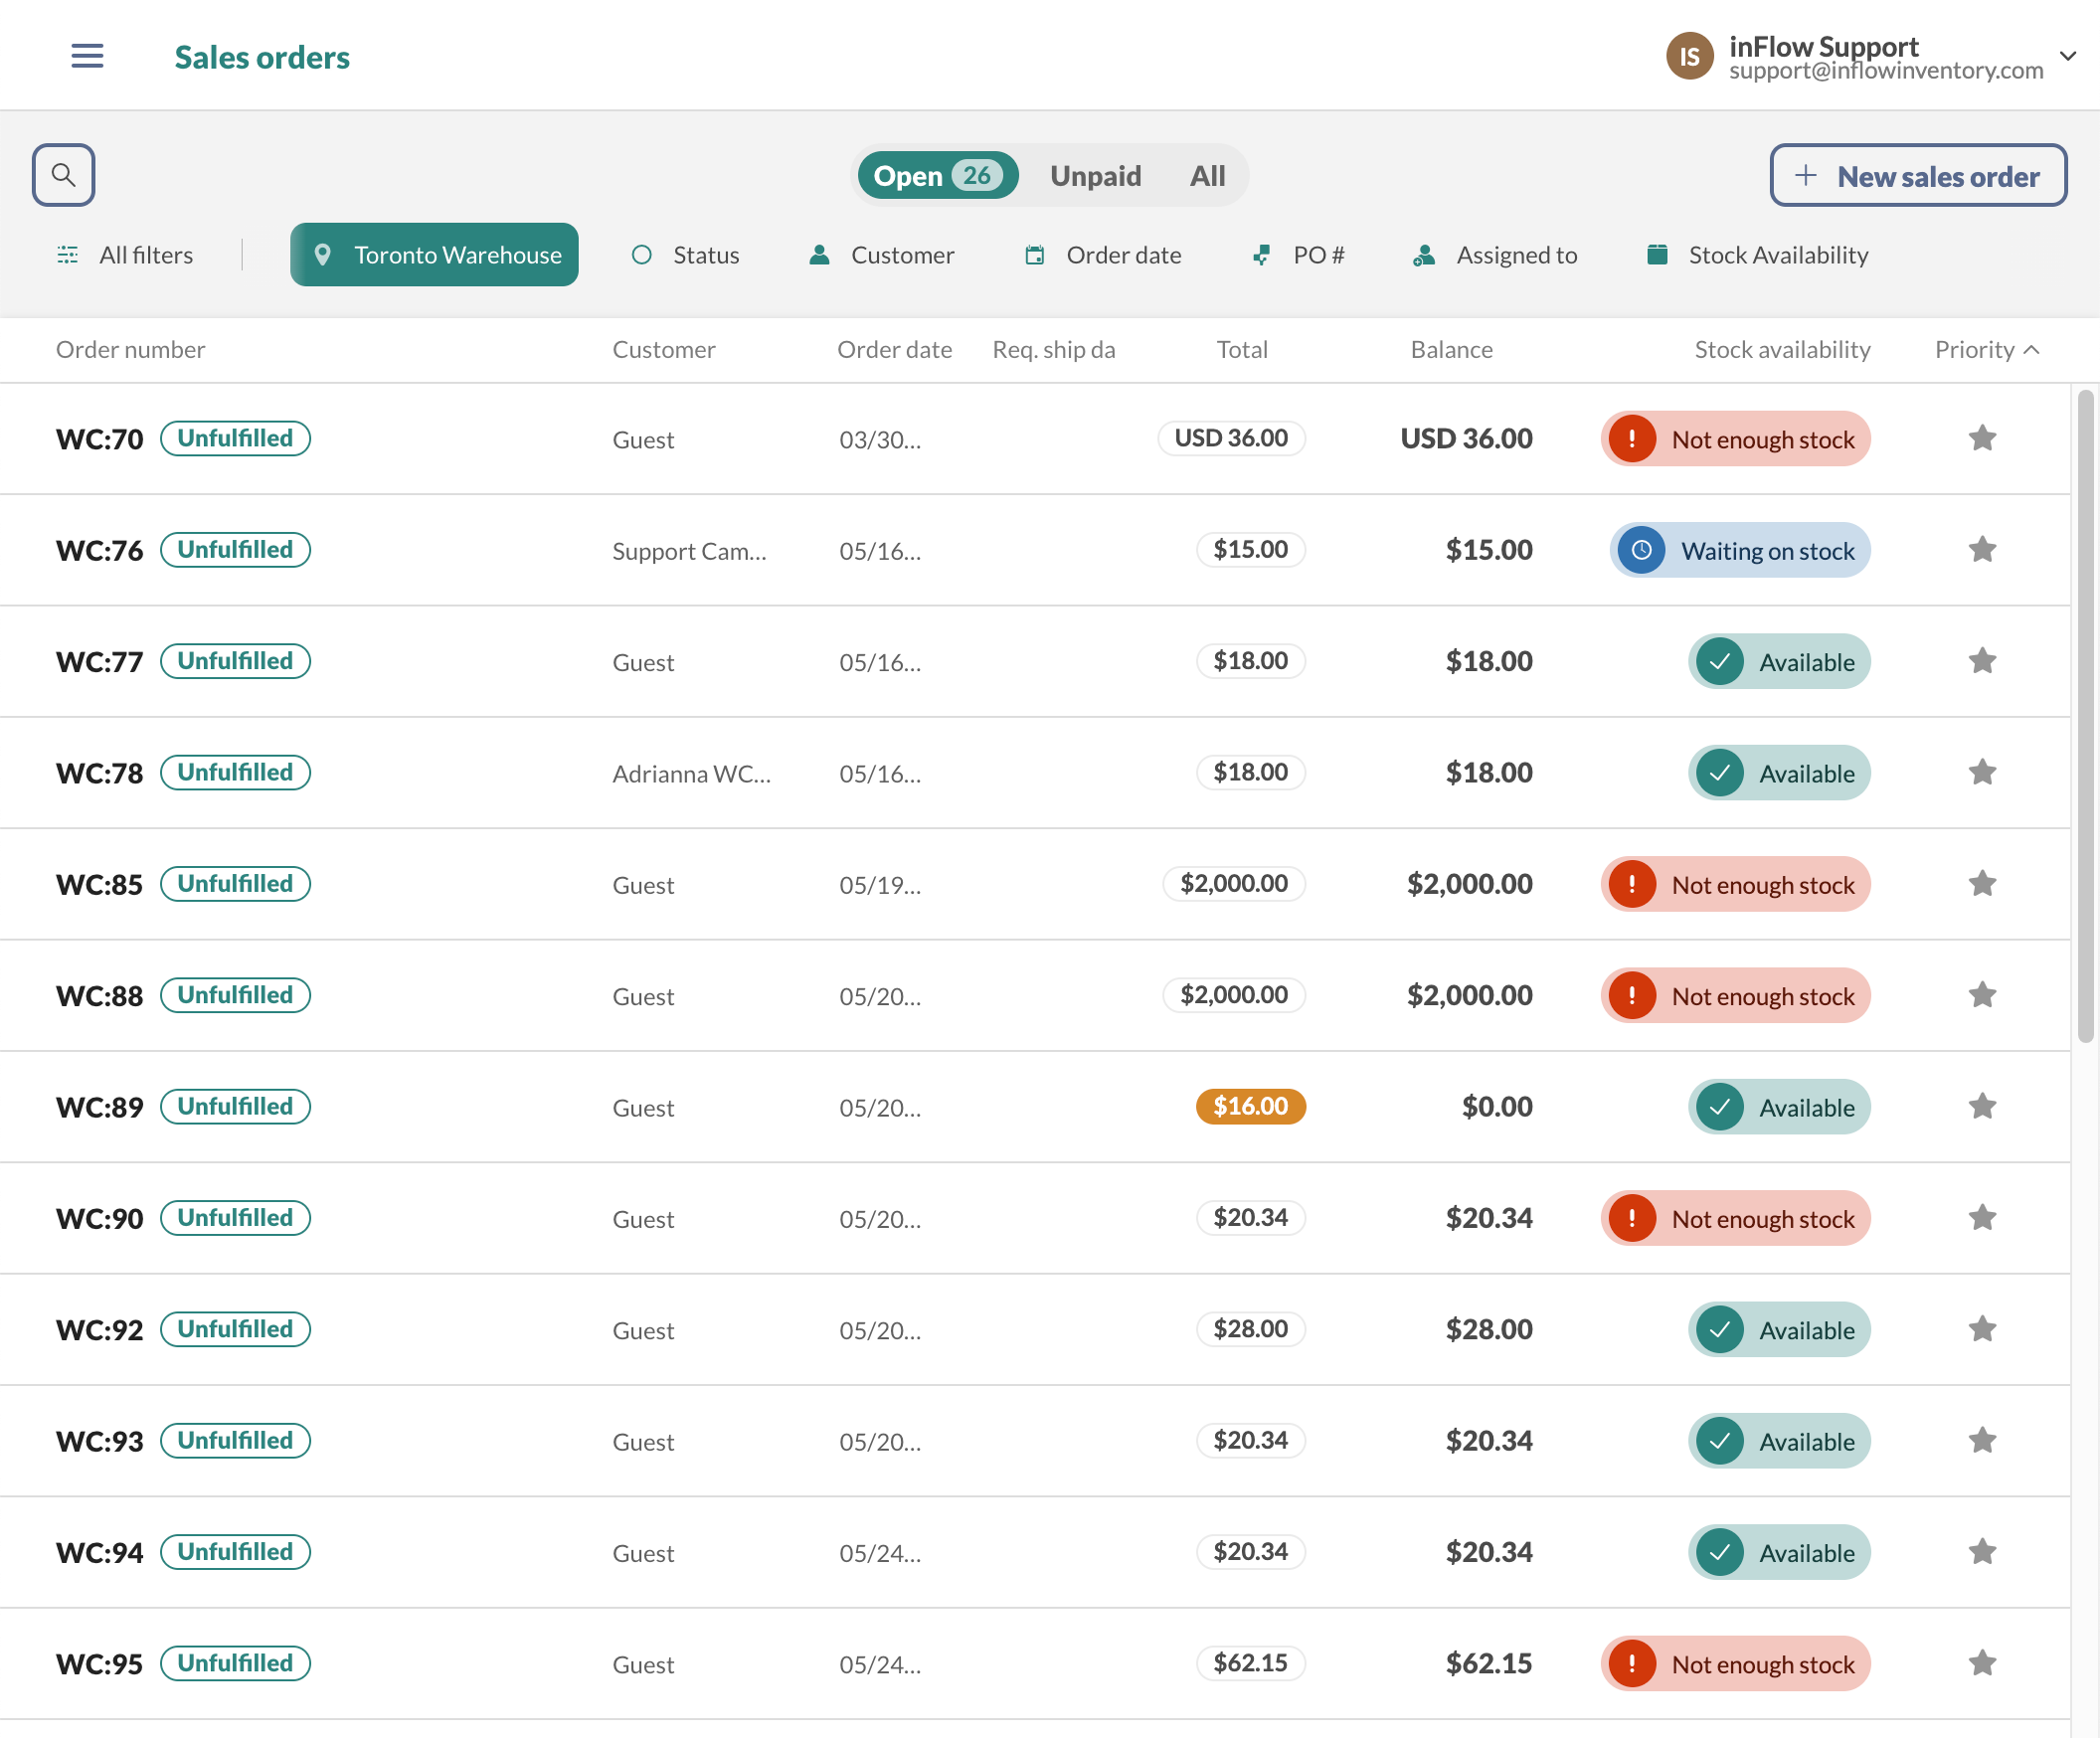
Sales order list view
You can view all your open and in-progress sales orders from the sales order list.
At the top of the screen, you’ll see pre-made lists to help you view Open, Unpaid, or All orders. You’ll view Open by default.
Below the main order statuses, you’ll find additional filters to help you find the orders you’re looking for. To change which filters are on the screen, click All filters.
Hover over the headings: the ones with two arrows next to them mean you can sort the sales orders by that heading. You can sort by Order number and status, customer name, and more.
For best results, we suggest a minimum screen resolution of 1280 x 720.
Customizing sales order lists
Take a look at the 6:05 minute mark to learn how to customize the sales order list view.

Sales order prioritization
You can click on the star icon to mark sales orders as prioritized.
- Prioritized orders will appear at the top of the Sales Order Open list view.
- You can click on the grab handles to drag and rearrange the sales orders to set the prioritization order (when the sales order list is sorted by Priority).
The sales order at the top of the list will be given priority for processing. You can learn more about the importance of the order placement, Stock availability & sales order prioritization section of this article.
If you’ve changed the sorting of the sales order list by clicking on another column heading, the priority orders may not stay at the top of the sales list. However, you can still identify prioritized orders because they’ll have an orange bar and star next to them.
To restore the original sorting with priority at the top, click the Priority column heading.
You can set team member access rights for sales order prioritization to View only or Full access. Take a look at this guide for how to restrict team member access rights.
Noticing priority list changes
Unlike other order list screens in inFlow, changes to priority orders on the Open list are visible in real-time. If you notice any changes to the priority list while viewing the sales order list, keep this in mind.
Stock availability & sales order prioritization
While viewing the Open list, you’ll notice that there are stock availability statuses listed for all the orders. These are listed based on the amount of inventory you have to fulfill the sales order.
inFlow will reserve stock on the prioritized orders first. Within the priority list, inFlow will reserve stock from the sales order at the top of the list.
Rearranging the priority list will cause inFlow to recalculate stock levels based on the position of each sales order on the list.
All other orders without a priority will be sorted by the Open list by default:
- Requested ship date
- Order date (oldest to newest)
Stock availability statuses
See the table below for a breakdown of the sales order list statutes.
| Available | This status indicates that you don’t have enough products in stock to fulfill your order. You should create a purchase order, transfer stock from another location, or create additional stock with a work order, if applicable. |
| Waiting on stock | This status is also known as Quantity on order. It means there isn’t enough stock to fulfill the sales order. This status shows when you’ve ordered more from your vendor, are waiting on a stock transfer, or are waiting on more to be made from a manufacture order. |
| Not enough stock | This status indicates that you don’t have enough products in stock to fulfill your order. You should create a purchase order, transfer stock from another location, or create additional stock with a manufacture order, if applicable. |
inFlow quantities
inFlow breaks down quantities in a few ways to help you organize your inventory. You may wonder what the difference is between quantity on hand and quantity available. For more information, refer to this guide on how inFlow calculates various quantities.
Can the sales order list view be saved?
Currently, only the priority sales orders view is saved when viewing the sales order list. This means any sorting and filtering of the list will need to be set every time you’re on the sales order list.
I can’t find some of my sales orders!
If you’ve noticed that some of your sales orders that were showing on the inFlow Inventory for Web app aren’t listed anymore, don’t worry. Your orders are still in inFlow!
They’re probably not displaying on the default Open list view because the Open list shows only orders that have been assigned locations. If you have sales orders without locations, they will be shown in the All view.
To learn more about how to add a location to your sales order and how the views work, take a look at this guide.
What are the default sales order list settings?
You might be wondering about the logic of how the order list is sorted. Take a look at the table below.
| Open | In this view, you’ll see all sales orders where fulfillment isn’t complete. As mentioned, orders that have been starred will be at the top of the screen. After the priority sales orders (or if there are no priority orders), the sales order will be shown from oldest to newest first. This will help you focus on fulfilling orders for the customers who’ve been waiting the longest for their orders. Orders will be sorted by requested ship date, and if that isn’t filled out, then by order date. |
| Unpaid | In this view, you’ll see all sales orders that have the payment status as not paid. Similar to Open, the Unpaid list will sort the oldest unpaid orders first, based on the order date. This will also help you keep track of older unpaid orders. |
| All | In this view, you’ll see all sales orders. This includes sales quotes, unconfirmed, and canceled sales orders. This will show all orders. You’ll see the newest sales orders at the top of the list and the oldest at the bottom. |
Receiving payments from emailed orders
If your business is located/registered in the United States or Canada, you can sign up for inFlow Pay to accept credit card payments from orders you email from inFlow! For complete details on this, take a look at our inFlow Pay article here.
Windows
Creating a sales order
- Click Main Menu > Sales > New Sales Order.
- Begin by adding your customer information at the top of the order:
- If your customer is already in the system, you’ll see them highlighted as you type their name into the Customer field
- If your customer is not in your system yet, continue typing out the full customer name and click Add New to create a new record for them. As you fill out their contact information, inFlow will automatically save it to their product record.
- The location will automatically be set. Change the location as needed. If there are multiple locations the items are being sold from, you can simply delete them and leave the field blank. (it’ll pick the item based on the picking options that you set)
- Add items to your order by clicking into the Item column and entering your product name.
Did you know you can buy barcodes with inFlow? We’ve teamed up with GS1 to be an official partner. This means can create UPC barcodes that will be recognized by retailers such as Amazon and Walmart. For more details, check out the GS1 Barcode Shop.
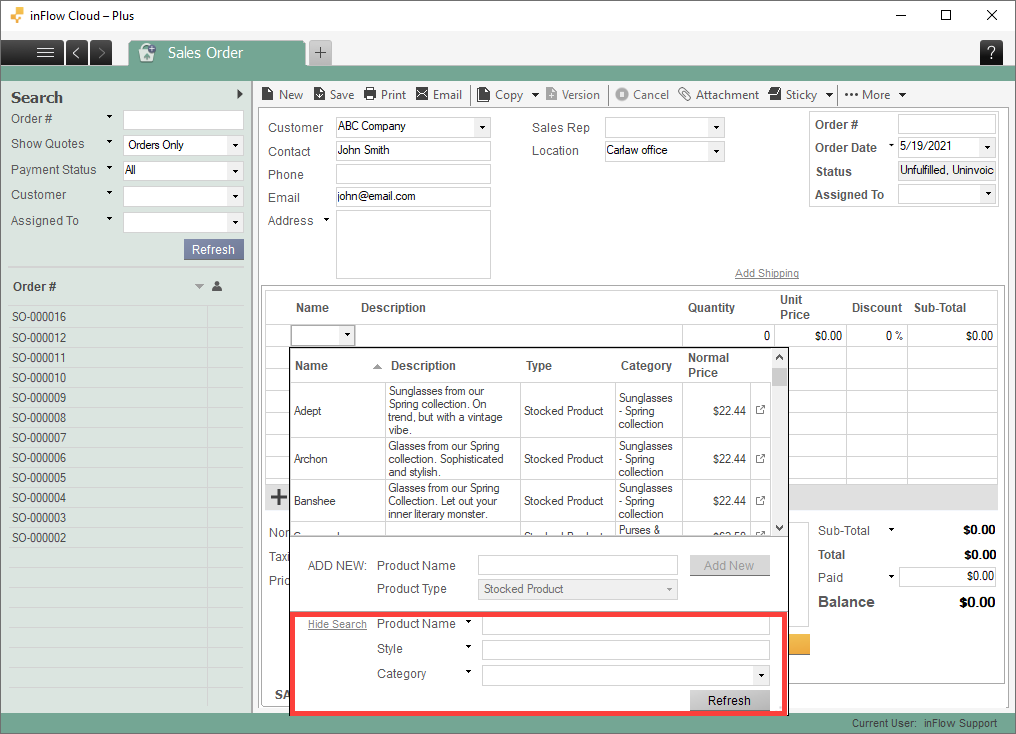
When adding items to your order, you can filter your product selection by clicking Show Search in the product table. This allows you to quickly search for your products by vendor, category, price, and other fields — right from the order!
Completing a sales order
- Click Fulfill when your customer has received the items on the order. This will move the items out of your inventory.
- If your customer has not yet paid you, you can click the arrow button beside Mark Paid and select Mark invoiced. This will move the order to an Invoiced status. Printing an Invoice document will automatically mark the order as Invoiced.
- If your customer has paid for part of the order, you can put that amount into the “Paid” field to keep track. If they’ve paid the full amount, click Mark Paid to complete the payment. You can also click the “Paid” field to record more detailed information like a reference or cheque number.
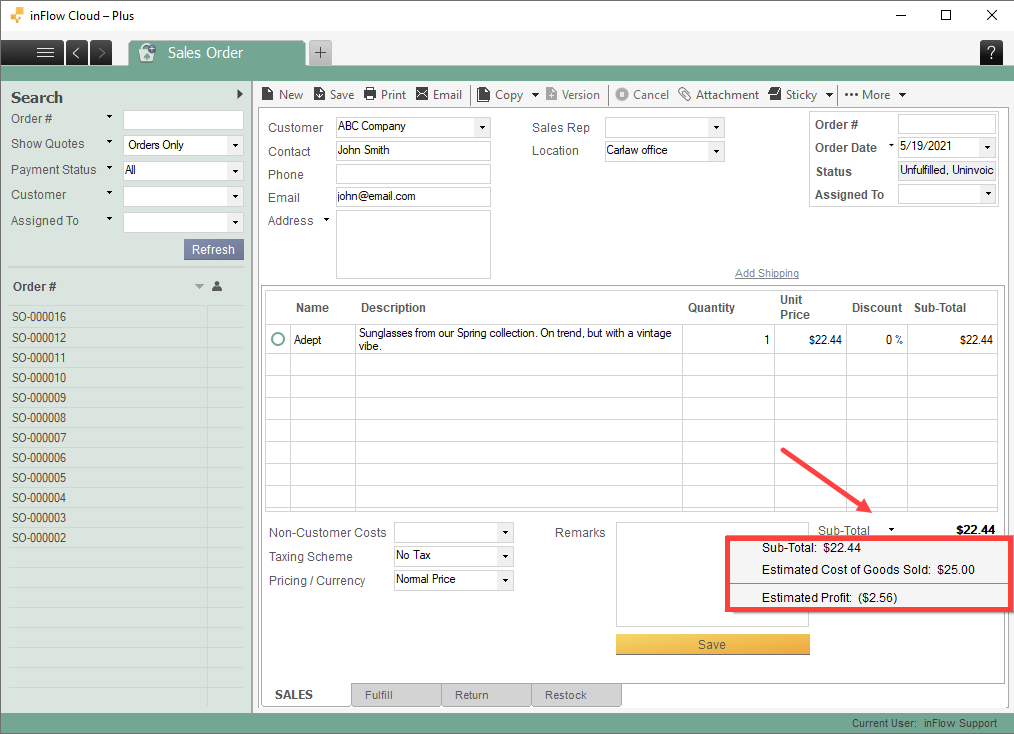
To view your order profit
You can easily view the total estimated profit of a Sales Order by clicking the drop-down on the Sub-Total heading in your Sales Order. This will quickly show you the Sub-Total, Estimated Cost of Goods Sold, and Estimated Profit in this Sales Order.
The profit is calculated by taking the cost of each item as well as any non-customer costs and subtracting them from the sub-total to get your profit.
NOTE: Since this is only an estimate, inFlow uses the applicable costing layer to calculate your profit on the order (this is especially applicable to those using FIFO or LIFO costing). Once the order is complete, inFlow will calculate the actual profit using the true costs on the order.
You can learn more about how to pick, pack, and ship your sales orders from this guide.
What else can I do on the sales order screen?
There are other advanced things you can do from the sales order screen as well. You can:
- Adding taxes to your orders
- Adding shipping / requested ship date / due date
- Entering specific payment details (payment method, check number, etc.)
- Partially shipping items out due to back order
Receiving payments from emailed orders
If your business is located/registered in the United States or Canada, you can sign up for inFlow Pay to accept credit card payments from orders you email from inFlow! For complete details on this, take a look at our inFlow Pay article here.
Mobile
If you’d like to create sales orders on the go, you can use the inFlow mobile app!
How to create and complete a sales order
The following are the basics – we’ve packed a lot of functionality into mobile sales orders, so be sure to check out the other sections in this guide to learn more about specific actions and screens.
- Open the inFlow Inventory app on your mobile phone, tap on the Main Menu button (the 3 horizontal lines at the top left of the screen), and select Sales Orders (or directly tap on Sales orders on the homepage).
- On the sales order list, tap the ‘+’ symbol on the top right of the screen to create a new sales order.
- Select a new or existing customer to add to your order.
- If you create a new customer, the only required field is Customer Name – you can edit their information later by tapping the Main Menu button > Customers.
- Tap Add product to add products to your sales order (or scan your product barcode instead by tapping Scan product). You can tap on the product you want to add to the order, then tap Add at the bottom of the screen.
- You can search your item list by tapping the search bar at the top.
- Once you’ve chosen all the items you want to add, tap Done to return to your sales order.
- Tap or swipe left to the Details tab to edit the order details, including customer information and shipping, edit inventory details (where inFlow should remove inventory from), add payment terms, remarks, etc.

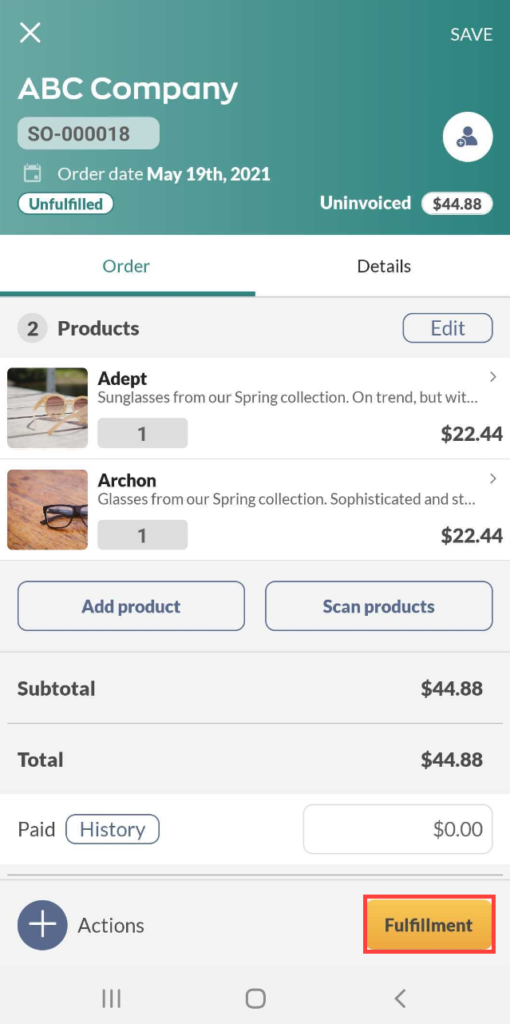
- When you’re ready to pick the order, tap the yellow Fulfillment button (or Pick order if you have shipping turned on). Here you can select which items to pick to fulfill your order. The sales order will become fulfilled once all products are selected.
- Add any payments to the order by tapping or swiping right to the Order tab and tapping into the Paid field.
- Finally, tap Save on the top right to save your order.
Adding products by scanning their barcodes
If your products have barcodes, you can quickly add them to your order using your phone’s camera!
- On the Order tab, tap on Scan products.
- Position the barcode within the frame. When the camera detects a barcode, the Scan item button will turn orange.
- Tap the Scan products button or the camera view to scan the barcode:
- Scanning the same barcode more than once will increase that product’s quantity by 1 for each additional scan.
- You can scan different items all at once from the barcode scanning screen!
- When you’re done scanning your items, tap Done to add these items to the order.
Editing products
Tapping on an item on the sales order will take you to the Product details screen, where you’ll be able to edit the following:
- Quantity: you can tap into the field directly and type in a value or use the ‘+’ and ‘–’ buttons instead.
- Unit of measure (UoM)
- Unit price
- Item discount
- Taxing scheme
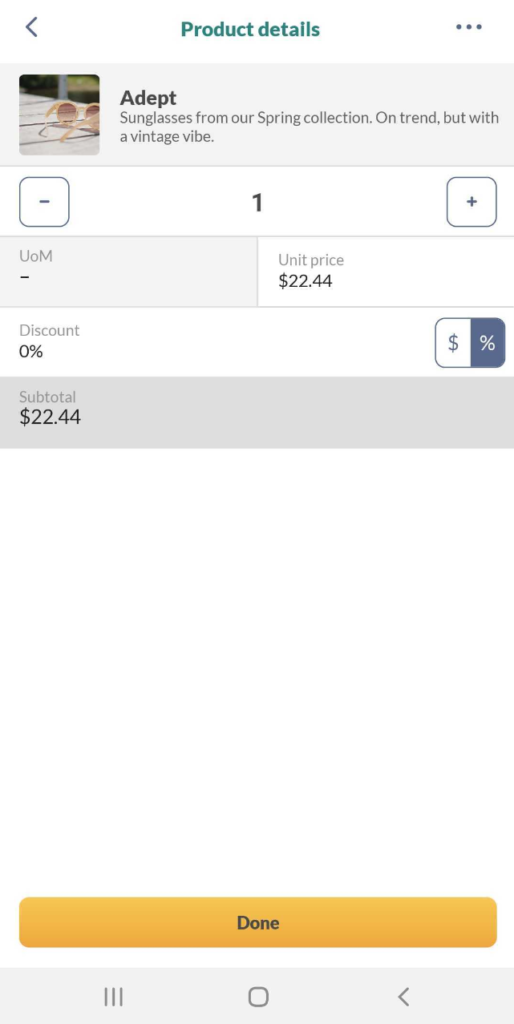
To save your changes, make sure to tap the yellow Done button. Going back using the ‘<‘ button on the top left will close the window and discard your changes instead!
Removing products
Did you add a product to an order that you’d like to remove? Here’s how to do it:
Note: If you’d like to return an item that was previously purchased, see here for steps!
- Tap on the Edit button above the item list on the Order tab.
- Tap the X symbol on the top left corner of the product/s you’d like to remove.
Fulfilling/Picking products
Once you’ve added your products to the order, you can start fulfilling/picking it!
Click the yellow Fulfillment button on the bottom right when shipping is turned off.
Click the yellow Pick Order button on the bottom right when shipping is turned on.
How to fulfill/pick items on your order
- To auto-fulfill/pick all items on the order, tap on the picking progress button on the bottom right and select Autofill.
- To mark an entire item line as fulfilled/picked, tap on the empty checkbox on the left side.
- You can also fulfill/pick your items by scanning them! Tap on the barcode icon on the top right to open the camera barcode scanner.
To unfulfill/unpick an item:
- To auto-unfulfill/unpick all items on the order, tap on the picking progress button on the bottom right and select Unpick all.
- Tap on the gray checkmark on the left side of the item line OR the ellipsis (three dots) on the right side to open the actions menu and select Unfulfill/Unpick or Partial fulfill/pick to adjust the number of fulfilled/picked items.
More actions menu
Next to each item line on the Fulfill/Picking screen, tapping the ellipsis (three dots) on the right side will open the More actions menu. Here you’ll be able to:
- Edit the location where the product will be fulfilled/picked from.
- Edit the fulfilled/picked date for products that have been fulfilled/picked.
- Partially fulfill/pick items.
- Unfulfill/unpick items.
Shipping
To include shipping an order, swipe left to get to the Details tab. When the shipping toggle is ON, the shipping address, required ship date, and the PO number will appear.
In the mobile app, all picked and unshipped items on an order will be shipped in the same box. The box number and the contents of the box cannot be edited from the mobile app. However, you can remove an item from a shipment.
Ship all items on an order
When all items are picked on the order, a Ship order button will appear on the bottom right:
- Tap the Ship order button to open the Shipping details screen.
- Enter your shipping details and tap Complete shipment to mark the items as shipped.
Remove items from a shipment
In the mobile app, it isn’t possible to see what items were shipped in a specific shipment. To remove an item that has been shipped on an order (without deleting the entire shipment), you can unpick the item from the order.
Edit/remove a shipment
You can edit your shipments in the Shipping details screen:
Note: it’s not possible to see what items were shipped in a specific shipment in the mobile app.
- Tap on the + Actions button on the bottom right corner and select Ship.
- In the Shipments screen, tap on the shipment you’d like to edit to open the Shipping details screen.
- Here, you can edit the shipped date, add shipping remarks, carrier, and a reference number or delete the shipment.
Returning products
Similar to the desktop app, a returned item in the mobile app will appear as a separate line item.
There are a couple of ways to return items in the mobile app:
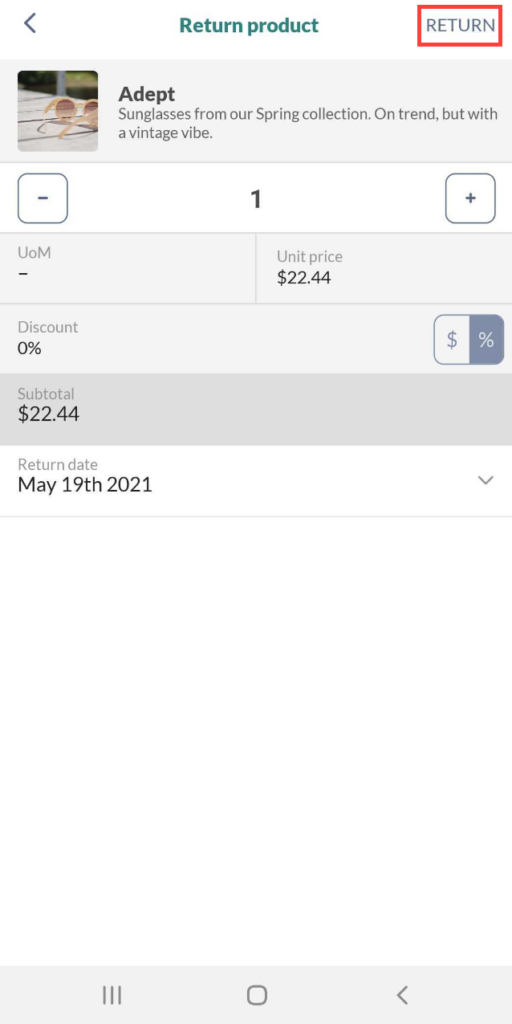
Returning an existing item on an order:
- Tap on the item on the order you’d like to return.
- On the Product details screen, tap the ellipsis on the top right and select Return product.
- In the Return product screen, enter the quantity you’d like to return and tap Return on the top right to complete the transaction.
Returning an item that is not on an order
Sometimes, you may need to return an item from a customer that wasn’t on an order to begin with. You can do this on the mobile by adding the item as a returned item:
- On the Order screen, tap Add product and select it from your product list (or scan its barcode by tapping Scan products).
- In the Add product screen, set the quantity to a negative amount to mark that this item will be a return (e.g., if you want to return 2 items, you’ll add a “-2” quantity).
- Tap Return on the top right to complete the transaction.
Invoicing and payments
At the bottom of the Order tab, you’ll find the subtotal, tax amounts, freight, the order total, the paid amount, and the order balance.
- To mark the order as invoiced, use the + Actions menu on the bottom left and select Invoice.
- If you’d like to mark the entire order as paid, you can use the + Actions menu on the bottom left and select Mark paid.
- To record a partial payment, tap into the Paid field and enter the amount paid.
- You can also add payment via the Payment History screen (see below).
Payment history
You can tap on History next to the Paid text to access the payment history for the order.
- Tapping Add payment will open a Payment details screen where you can enter a new payment.
- Tapping on an existing payment will open the Payment details screen.
Payment details
The Payment details screen allows you to edit the details of a specific payment, such as:
- The amount applied (this will be negative when making a refund)
- The refund toggle – this will mark the amount applied as a refund.
- Payment method
- Date
- Reference number
- Remarks (per payment)
Pricing, currency, taxing scheme, and non-customer costs
You can edit which pricing scheme, currency, and tax to apply to the order, as well as add non-customer costs from the Pricing screen. Swipe to the very bottom of the Order tab and tap on Edit pricing.
It is not possible to create a new pricing scheme or taxing scheme from the mobile app.
Remarks
In the mobile app, all your sales order remarks can be added from the Details tab. You’ll be able to edit:
- Sales remarks (in the desktop app, these would be found in the Sales tab).
- Pick remarks (Windows app: these would be found in the Pick tab).
- Ship remarks (iWindows app: these would be found in the Ship tab).
- Return remarks (Windows app: these would be found in the Return tab).
- Restock remarks (Windows app: these would be found in the Restock tab).
To add a remark:
- Swipe left or tap on the Details tab from the Sales Order details screen.
- Scroll to the Remarks section at the bottom and tap into the remark field you’d like to edit.
- Tap Save on the top right to save your changes.
Receiving payments from emailed orders
If your business is located/registered in the United States or Canada, you can sign up for inFlow Pay to accept credit card payments from orders you email from inFlow! For complete details on this, take a look at our inFlow Pay article here.
If you’d like to know more about the inFlow Inventory Companion App, check the full guide here!


How do you sort the invoice by product name?